Friday, March 28, 2008

How to grow a great carrot crop

Carrots have a delicate beauty with their with lacy, fernlike foliage that is perfect for containers and flower borders. I used to mix carrots in with my flowers and I still do but I grow all my carrots in containers.

I prefer growing carrots in containers so that I can control rabbits, insects and so that I do not have to dig up the carrot crop. When its time to harvest, I just lay down an old sheet and dump the container. The carrots go to the house and the soil goes to the compost bin. My crop is harvested in minutes with no back strain.

You can grow mini carrots, long carrots and carrots that are yellow and red. I have to admit I grow all the colors. There’s something about a plate of vegetables full of color that appeals to my artistic side.

Below are tips for growing a great crop of carrots.

  • I start a small crop of carrots every two weeks for a continuous crop of small tender carrots.
  • Carrots are cool-season vegetables but they perform best in temperatures between 60 and 75-degree weather. 
  • Choose a site that gets full sun. Carrots tolerate light shade but won’t do as well
  • Soil should be as rock free as possible, with a pH of 5.8 to 6.8.  I use homemade compost for my carrots.
  • If you use regular soil, dig the soil to a depth of 12 inches and remove all rocks and any other soil debris. Any small object will possible stunt the carrot root or make it fork.
  • Add plenty of organic matter. It lightens heavy soils and increases the moisture retention of sandy soils.
  • Sow carrot seeds directly on the soil about two to three weeks before the last expected frost in cool regions.
  • In warm climates, you can plant in the fall, winter or spring. Like most root crops, carrots rarely appear as started plants in nurseries. The reason is there is too much of a plant shock to make the plant grow successfully after transplanting.
  • Carrots seeds can germinate slowly so to help the process I soak the seeds in water for six hours before I plant them.
  • Seeds that were not soaked can take more than 10 days to germinate. Soaked seeds will take about 5 days to sprout.
  • I also mulch the top of the soil with 2 to 3 inches of grass clippings or composted materials once the seeds sprout. Carrots will grow sweeter and be less fibrous in soil that remains moist.
  • Make early sowings shallow to capture warmth from the sun. Sprinkle the seeds on the soil surface, tamp them gently and cover them with a thin layer of finely sifted compost. If you are planting later, after the soil has warmed up you can plant the seeds 1/4 to 1/2 inch deep.
  • To produce a better crop thin the seedlings before the tops become entwined. I clip off the greens with scissors, so that I do not disturb the other carrots that are growing.  You can also pull the roots very gently from the ground making sure not to disturb the remaining plants.
  • Carrots are cool-season vegetables but they perform best in temperatures between 60 and 75-degree weather. 

Additional Tips

  • Spray young plants once with compost tea to ensure good growth   
  • Mulch with compost to deter weeds and retain moisture.
  • Young plants will need at least an inch of water a week. You can reduce the water when they near maturity.
  • Carrots need lots of potassium. Lightly sprinkle wood ashes over the planting area before you sow the seeds. This will add the right amount of potassium for you crops.
  • Make sure the carrot roots stay completely covered with soil to prevent green tops and bitter carrots.
  • If your carrots turn out with a branch or two, it means they’re getting too much nitrogen.

Carrots have many healthy benefits, store well and are relativiely easy to grow. They are a great addition to any garden.
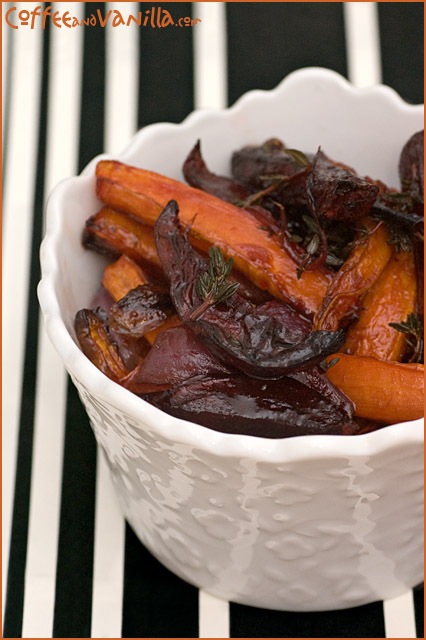
Roasted Carrots and Beets in Balsamic Maple Syrup


1000g young carrots ( cut into sticks, 1 cm thick) 1200g large young beets / beet roots (peeled and cut into sticks or slices as well, 1 cm thick) 500g red onions (cut into wedges) 4 tbs olive oil sea salt rainbow peppercorns or black peppercorns

dressing 3 tbs balsamic vinegar 3 tbs red wine vinegar 3 tbs soft brown sugar 4 tbs maple syrup 3 tbs fresh English thyme leaves or frozen English thyme

two large non-stick baking trays or normal trays lined with Teflon sheets

Preheat oven to 180°C (356°F). Toss the vegetables with olive oil, season with freshly ground pepper and salt and transfer to the baking trays. Bake for about 45-60 minutes tossing them from time to time.

In meantime prepare dressing, combine all ingredients together and leave aside till vegetables are ready. When vegetables are roasted toss them with the dressing and serve or place in a container to use later.

This recipe make enough vegetables as a side dish for 8-10 people.

* I served only half of the vegetables for four of us and the rest reheated in microwave next day, they tasted even more delicious.

** Taste great as a side dish with meat, mashed potatoes or couscous and even in a cheese sandwich!

Oven roasted baby carrots


I've never been a fan of cooked carrots, especially if butter wasn't involved. However, trying to add a few nutrients to our dinner, I tossed a bag of baby carrots in with a pound of baby golden creamer potatoes. I used to make just potatoes this way, but in the end, hubby and I were picking around the potatoes to get to all of the carrots. Next time, we'll just go for the carrots.

Ingredients:

1 bag of baby carrots (whatever size you prefer- cut up big carrots will probably work as well)
Olive oil
Salt to taste
Black pepper to taste
Powdered thyme to taste
Crumbled dalmation sage (any other sage can be substituted) to taste

Preheat the oven to 375 degrees. Pour the baby carrots onto a paper towel and pat dry. Dump dry carrots into a medium to large mixing bowl. Drizzle enough olive oil over the carrots to coat well, but not enough to be sopping.

Add salt, pepper, thyme, and sage. Toss or stir to coat.

Line a baking sheet (cookie sheet with sides) with non-stick foil. Pour carrots onto baking sheet and try to keep to a single layer. Bake for 30-45 minutes.

Roasted carrots with Thyme


Roasted Carrots with Thyme

Ingredients
about 8 carrots, peeled if skin is thick, otherwise just scrubbed well
olive oil
kosher salt and freshly ground black pepper
about 1 tbsp fresh thyme leaves

Directions
Preheat the oven to 425.

Cut the carrots on the diagonal into roughly 1 inch pieces. Place on a baking sheet and drizzle with olive oil (I never measure, but it’s usually about a tablespoon give or take.) Sprinkle with kosher salt, freshly ground black pepper, and thyme leaves. Use your hands to toss the carrots with the oil, salt, pepper and thyme right on the baking sheet.

Roast for about 25 minutes, stirring occasionally, until the carrots are nicely browned on the edges but not burned, and tender when you pierce one with a fork. Sprinkle with a little more fresh thyme when you serve, if you like.

Serves 4.

Carrot’s reputation undeserved

One vegetable that can be directly seeded into the garden this time of year is the carrot, which has developed — unfairly, I might add — a reputation for being difficult to grow.

My detractors would argue carrot seeds are tiny and difficult to handle. The seeds also can be slow to germinate. In gardens in northeast Kansas that have a good deal of clay in the soil, carrots may emerge from the ground at harvest with a slightly gnarled appearance, as if they had been butting up against concrete for several months. Clay soil will do that to you.

But all of these problems are mere trifles, which can be dealt with fairly easily. The reward is being able to grow a crop that is about as low-maintenance as they come. A little bit of weeding, the usual watering and mulching and — voila! — you’ve got carrots in June. Because carrots grow underground, bugs aren’t a concern. They don’t get diseases. What’s not to love?

Well, hard soil can indeed be a problem. Carrots don’t mind tired soil, but the strain of growing in clay can turn them ugly. If you have a raised bed, plant them there. If you don’t, you’ll need to make sure you till deeply. A good trick is to make a few passes over the carrot bed with the tiller, then dig down below the tilled soil with a fork and lift up the next layer of hard soil. Then pass over the row with the tiller again.

If the soil tends to pack when it dries, liberally spread sand over the carrot bed and till it under.

To fix the germination problem, you’ll need to provide insulation for the planting site. First, draw a furrow in the soil and wet it down. You’ll want to be sowing seeds into moist soil. Have a roll of kitchen plastic wrap on hand when you plant.

The naysayers are correct that the tiny seeds are a problem. If you don’t have a seed syringe, you will need to disperse the seeds along the furrow using your fingers or a pair of tweezers, being careful not to damage the seeds. The goal will be to pinch as few at a time as possible. Ideally, the seeds would be spaced an inch apart initially.

Once you have the seeds sowed in the furrow, sprinkle a light dusting of dry soil over the seeds and cover the furrow with a sheet of the plastic wrap. Anchor the plastic with a brick to lock it down at one end of the row, then pull the plastic down the row as if you were covering a long casserole. Tear it off and anchor the loose end with another brick. Anchor the sides with additional bricks.

This may be the best gardening tip I have ever read in a book. I believe it came from Joseph R. Thomasson’s “Growing Vegetables in the Great Plains,” which I have plugged in this column before. While carrots prefer to begin their growth cycle in cool weather, their seeds need heat, preferably moist heat, to germinate. The plastic wrap lets sunlight in but incubates the seeds.

After germination and when the tops are an inch high, remove the plastic. You’ll thin the starts down to about 5 inches apart. You don’t want them to be seeded so thickly that pulling up one seedling will damage the roots of one next door.

When the carrot tops are about 3 inches high, weed the row and apply a light layer of straw mulch. The carrot tops will feed the roots by poking through the mulch to get sunlight. As the weather warms, apply a few more layers of mulch to keep the soil cool.

You’ll be able to check the progress of your carrots by taking a peek at the shoulders of the roots, which will be just below the surface.

When the carrots reach the width you want, loosen the soil around them, and carefully dig them up.

It’s that easy.

Veal Medallions with Carrot-Sunflower Risotto

Free Range Veal Medallions, Carrot-Sunflower Risotto, 
Fresh Ricotta, Pink Pepper, Lemon Oil 

Risotto

Ingredients:

3 tablespoons  butter
2 cups   hot chicken stock
1 cup    fine diced onion
½ cup   fine diced celery
½ cup   fine diced carrot
2 -3 tablespoons  sunflower seeds
1 - 1/2 cups   Arborio Rice
¼ cup   dry white wine
1 ½ cup   fresh room temperature carrot juice
3-4 tablespoons  fresh ricotta cheese
3 tablespoons  Parmesan cheese grated
Salt and pepper to taste
Garnish with pink peppercorns and lemon oil

Method:

Sweat the onions, celery, and carrots in the butter,  add the Arborio rice and sauté on medium heat just for about a minute or two until the rice whitens just a bit. 

Add the white wine cooking until all of it is absorbed. 

Begin adding the hot chicken stock just a little bit at a time allowing all the stock to absorb before adding more. 

Once you have added all the chicken stock, begin adding the carrot juice in the same method until the rice looks done*. 

Add the sunflower seeds, parmesan, salt and pepper, and finish with the risotto. 
Spoon the risotto into portions, garnish with the pink peppers, lemon oil, and finish the plate with the cooked Veal, and your desired green.

* Please note you may not need all the liquid or you may need just a bit more than the recipe. You will be looking for a nice loose creamy consistency. The risotto will take about 30 minutes to cook out.

5 oz. free range veal medallions per person

Simply sauté the veal in olive oil, brown butter, or European style butter seasoned with salt and pepper.

Garnish with wilted spinach, micro greens, or my favorite …pea tendrils